PermaLink Caravan hinged shelf, stretcher bunk bed, sink lighting and sink splash back. 10/18/2009 09:06 PM


More caravan work, hinged shelf, stretcher bunk bed and sink splash back.

See the Pictures Here

Continuing on with more updates on the caravan from the last instalment which was where I
replaced the lino and installed a sofa bed. Now that the sofa bed was in I wanted to create a table to use when the sofa bed was in the couch position and that could be folded flat when it was in the bed position.

I still had ply left over from when we created the
shelves for the caravan and it didn't take long to have something whipped up and a coat of clear coat on it. I found there was a stud running across horizontally along the half partition wall to secure the shelf to and just used a piano style hinge along the length of the shelf.

Where I did run into trouble was trying to find a solution to secure it in the folded out position, my intention was to use the metal hinged style brackets that they use on things like card tables and picnic table legs to hold them in place. I found something similar at Bunnings but when I came to use them found that due to the design they didn't fold flat or worse didn't allow the table to fully extend out.

I messed around modifying them by drilling out the rivets at the hinged points, cutting them down so each half was at equal lengths and riveting them again. This solved the extension and folding flat issue but after finally getting them sorted a new issue arose where they were to weak to reliably hold the shelf out. After 3 hours of mucking around with these supports I gave up and binned them and instead I just used the simple option a wooden support, which is hinged up from the floor.

One of the major projects that I needed to do was to add an extra bed into the van, with Malcolm using the caravan at Xmas he requires an extra berth to sleep his 3 kids. This has posed quite a dilemma for me, I didn't want to create a permanent fixture so it needed to be removable, Malcolm had suggested a stretcher bed type arrangement, as this is what the caravan he used whilst in Denmark had.

I looked at getting a piece of canvas sewn up but the cost was prohibitive, I looked at camp stretcher beds but once again they were too expensive, but as luck should have it Aldi came to the rescue with a stretcher bed for $40 in one of there weekly specials.

Armed with an Aldi stretcher bed I was pleased to find that I could unbolt the centre section to remove the canvas (its actually PVC & polyester) and this also allows the canvas to be put back on if we ever require a camp stretcher.

I needed to figure out the construction, I have probably over engineered it but the thought of it collapsing worried me greatly. As the stretcher poles span from side to side and are unsupported in the middle I needed something that would not deform and possibly pop out of each end. I had 2x pieces of 50x50 box tube left over from when we
made the rear bumper, they weight an absolute ton and make it awkward to put the stretcher bed in and out of place but at least I don't need to worry about there strength.

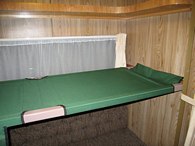
From here I worked on the fixing of either end of the stretcher poles, there is evidence of a bunk bed possibly being in the caravan at some stage and a piece of hardwood screwed into the kitchen partition wall being a remnant of this installation, when It came to remove it I found that it was screwed into nothing more than the single sheet ply that makes the wall material. With the stud finder I found a horizontal stud less than 4" above where this timber was located.

Down the other end finding a secure mounting was trickier there was only 2 studs in the middle to use so to resolve this I ran it around 90 degrees in the corner to where another stud was located on the other wall.

I purchased a good thick piece of hardwood to make up the end supports and checked out the notches for the poles to go into. Once I was happy with the fit I secured both with copious amounts of liquid nails and screws.

Both poles had been used for something else at some stage and were pretty knocked up so I sanded them both back fitted some end caps and then gave them a coat of spray paint to clean them up.

Whilst I was at Bunnings I noticed an under bench fluoro light on the specials table which I thought would be perfect to use above the sink where light is almost non existent. I soon figured out why they were so cheap, they have the most pathetic mounting system you have seen, I have the nagging suspicion that 10 minutes down the road I will find it has fallen off and ended up in the sink.

Once the light was in place and shining light around the sink I realised just how awful the silicone around the sink had become, I had some brown silicone left over from when I used it around the edge of the flooring so I set about cutting back the old silicone.


Now I really hate silicone and I know I that I always do an awful job so I thought I would be clever and run masking tape around so I would get a nice clean sharp edge, and this ended up working a treat, but what didn't work was the fact that when I removed the masking tape off the wall, it also took the colour print off the wall as well.

So from here I decided the best way to hide my stuff up was to make a sink splash back (funny how one thing leads to another). I once again used the self-adhesive tiles that I used on the floor but these have a stone pattern and I finished it off with a fancy piece of quad to dress up the edges.


So I am almost done for this years caravan work, but I still need to figure out where to store the bunk stretcher bed when its not being used as its to long to fit in any of the under seat storage.

Please feel free to post a comment:v

1. Adele McCormack07/05/2013 04:11:45 PM


This is fantastic, thanks so much for posting it, I have been working on ideas of how to put a removable bunk into my caravan for when my daughter wants to take her 2 girls away but so it doesn't have to be in my way when I want to use it as I normally do. This is perfect for me. I will need to work out a system for the foot end as there are not 2 walls to work between but I can build a bit of a framework.

Great that you are happy to share your good ideas with everyone.
I am really really happy now and will get to work measuring and checking out the little stretcher bed I sometimes carry in the car for emergency o/night accommodation.
bye for now Adele


2. julie29/07/2010 07:09:19 AM


I am currently decking out a van and have been looking at splashbacks not sure it is safe to use vinyl tiles i was told you need heat resistant backing behind and beside gas stove/oven.


Copyright
All original content copyright Matt Arber all rights reserved, no reproduction allowed without written permission.

This website was taken down in 2014, but in 2023 I decided to resurrected it and bring it back online, as it is now over 20 years old, expect bugs and features to no longer work as they once did.

The website is 90GB in size and contains approx 30,000 photos taken by us between 2003-2011, it is hosted at home on an old HP Proliant NAS running Lotus Domino 8.5 and spanning across multiple databases.

Weaselsnout
Stories by Category
Pictures of Holidays
2023 - Esperance WA
2022 - South Australian Coast
2021 - Nowa Nowa, Marlo
2021 - Marlo
2021 - Central Australia
2021 - Apollo Bay
2020 - Warrnambool, Portland
2020 - Mallacoota (Fires)
2018 - Mallacoota
2017 - Wallhalla
2017 - Huggets Crossing
2016 - Mallacoota
2015 - Mallacoota
2015 - Gold Coast
2014 - Mallacoota (again)
2014 - Mallacoota
2014 - Lake Eildon
2013 - Wilsons Prom
2013 - Torquay
2012 - Mitta Mitta
2012 - Mallacoota
2011 - Mallacoota
2011 - Bali, Seminyak
2011 - Mallacoota
2010 - Tasmania
2010 - Mallacoota
2010 - Marlo
2009 - Mallacoota
2009 - Marlo
2009 - Mallacoota
2008 - Marlo
2008 - The Grampians
2008 - Robe SA
2007 - Robe SA
2005 - QLD via the coast
Pictures of Places
Pictures of Things
Pictures of People
Pictures of Occasions
2011 - Our Wedding
2010 - Jamie & Sarah's Wedding
2010 - Xmas
2009 - Xmas
2008 - Xmas
2007 - Xmas
2006 - Xmas (Mallacoota)
2005 - Xmas
2004 - Xmas